Greetings with a quick post today! I have another clean & simple card for my friend's set of assorted cards. I made two of these shower cards really quickly with this simple layout. You could probably recreate these as some quick and easy to mass produce thank you cards for shower gifts as well. I did cut the umbrellas and add them with foam tape for a little dimension. To dress it up a bit and add some pizazz, I added some Star Dust Stickles to the polka dots and trim on the umbrella. Thanks for stopping by! Hope you are having a fabulous day! :-)
Supplies Used (all PTI unless noted):
Stamps: Scattered Showers
Ink: Raspberry Fizz, Dark Chocolate
Paper: Lemon Tart, White, Dark Chocolate
Other/Tools: Stardust Stickles, scallop edge punch, Scor-Pal, Scor-Tape, foam tape, paper trimmer, scissors
Tuesday, June 30, 2009
Monday, June 29, 2009
Card Patterns Top 5!
Happy Monday y'all! I made the Top 5 for the Card Patterns Sketch last week with this card ...
I totally squealed with I saw my name on their blog post as I went through my favorite blogs this morning on Google Reader. Check out all the other AMAZING top cards here!
Saturday, June 27, 2009
Perpetual Birthday Calendar How-To
Happy Saturday folks! I am constantly forgetting birthdays - and that makes me feel like a jerk! LOL I decided to fix the problem by creating a birthday calendar - a perpetual one so that I don't have to add them to a new calendar every year! I thought I'd share a little how-to for you ... Ready?
Start with 12 pieces of white (or other neutral) card stock cut into 3-1/2 x 6" rectangles. You'll also need two pieces of chipboard (or other card stock) for the front and back covers cut in the same dimensions.
Use a binding system, such as Carla Craft, to punch holes in your pages and covers. (If you prefer to use a binding ring, just punch one hole in the same spot on all your pages.) Now, you should have all your pages ready to go! Time to decorate ...
Cut 12 pieces of card stock in various colors. You need 3-1/4 x 1-1/2 inch rectangles. Then decorate as desired. I used the Vintage Picnic set from Papertrey ink to stamp all the images on the monthly titles. I colored the images with Copic markers and a white gel pen. Then I used the Fresh Alphabet set to stamp month abbreviations onto each card. (Tip: Use an acrylic block with grid lines on it to line up the letters!)
Here's January - June:
And here's July - December:
Once you are done decorating your month titles, adhere them to the top of your pages, so they look like this:
Then, add some lines using Faux Ribbon on each page like shown below. (Tip: That grid line block will really help you keep your lines equidistant!)
Then decorate your covers and bind it together with a coil (or whatever system you are using). And here's the finished product!Thanks for stopping by! I hope that you enjoyed my first how-to project! :-) If you have any questions, let me know! Have a great day :-)
Supplies Used (all PTI unless noted):
Stamps: Vintage Picnic, Fresh Alphabet, Faux Ribbon
Ink: Memento Tuxedo Black, Copic markers, Inkssentials white gel pen, SU! Going Gray
Paper: CS - White, Ripe Avocado, Lemon Tart, Melon Berry, Pure Poppy, Hibiscus Burst, Aqua Mist, Lavender Moon, Spring Moss; Polka Dot Parade patterned paper; chipboard from The Crafty PC
Other: Vintage buttons (New Leaf, Lemon Tart, Aqua Mist) and twine
Tools: Paper trimmer, scissors, Carla Craft binding system & coil, Scor-Tape, Glossy Accents
Start with 12 pieces of white (or other neutral) card stock cut into 3-1/2 x 6" rectangles. You'll also need two pieces of chipboard (or other card stock) for the front and back covers cut in the same dimensions.
Use a binding system, such as Carla Craft, to punch holes in your pages and covers. (If you prefer to use a binding ring, just punch one hole in the same spot on all your pages.) Now, you should have all your pages ready to go! Time to decorate ...
Cut 12 pieces of card stock in various colors. You need 3-1/4 x 1-1/2 inch rectangles. Then decorate as desired. I used the Vintage Picnic set from Papertrey ink to stamp all the images on the monthly titles. I colored the images with Copic markers and a white gel pen. Then I used the Fresh Alphabet set to stamp month abbreviations onto each card. (Tip: Use an acrylic block with grid lines on it to line up the letters!)
Here's January - June:
And here's July - December:
Once you are done decorating your month titles, adhere them to the top of your pages, so they look like this:
Then, add some lines using Faux Ribbon on each page like shown below. (Tip: That grid line block will really help you keep your lines equidistant!)
Then decorate your covers and bind it together with a coil (or whatever system you are using). And here's the finished product!Thanks for stopping by! I hope that you enjoyed my first how-to project! :-) If you have any questions, let me know! Have a great day :-)
Supplies Used (all PTI unless noted):
Stamps: Vintage Picnic, Fresh Alphabet, Faux Ribbon
Ink: Memento Tuxedo Black, Copic markers, Inkssentials white gel pen, SU! Going Gray
Paper: CS - White, Ripe Avocado, Lemon Tart, Melon Berry, Pure Poppy, Hibiscus Burst, Aqua Mist, Lavender Moon, Spring Moss; Polka Dot Parade patterned paper; chipboard from The Crafty PC
Other: Vintage buttons (New Leaf, Lemon Tart, Aqua Mist) and twine
Tools: Paper trimmer, scissors, Carla Craft binding system & coil, Scor-Tape, Glossy Accents
Thursday, June 25, 2009
Absolutely Fabulous!
Ok, so I admit that I have been hoarding these paper flowers for quite some time. My secret sister from an SCS swap sent them to me months ago. I love that they are girly and funky and vintagey all at the same time. The other day, I finally made a card with a few of them.I chose 3 different sizes and patterns and hooked them together with a gemstone brad (seemed appropriate) and kept it simple with pink and black card stock and an "absolutely fabulous" sentiment. Love it. I really need to go and get an old paperback from somewhere so that I can cut out flowers, etc. from it. :-)
Thanks for stopping by - hope you are having an absolutely fabulous day! :-)
Supplies Used:
Stamps: PTI Everyday Classics
Ink: Palette New Canvas
Paper: PTI True Black, Sweet Blush
Accessories: paper flowers from Making Memories Sabrina collection; gemstone brad by Paper Studio, PTI True Black luxe satin ribbon
Tools: Paper trimmer, scissors, corner rounder punch, Scor-Pal, Scor-Tape
Thanks for stopping by - hope you are having an absolutely fabulous day! :-)
Supplies Used:
Stamps: PTI Everyday Classics
Ink: Palette New Canvas
Paper: PTI True Black, Sweet Blush
Accessories: paper flowers from Making Memories Sabrina collection; gemstone brad by Paper Studio, PTI True Black luxe satin ribbon
Tools: Paper trimmer, scissors, corner rounder punch, Scor-Pal, Scor-Tape
June PTI Blog Hop: The Joys of Summer
Hi again! It's Papertrey Blog Hop time again! This month's theme was all about summer! Summer to me is all about flip flops and enjoying being either by the pool or by the beach. I also get to sew a lot during the summer when school is out and last year I completed a flip flop wallhanging. It's one of my favorite fabric projects and it hangs year-round in my craft room/office. So, going with the flip flop theme and a great summery-striped fabric from my stash, here's what I started with.
Here's my card based on flip flops and stripes...
One of my Splitcoast buddies sent me some images from the Day at the Beach set. I cut out a pair of the flip flops and colored them in with an RV14 Copic marker and added a polka dot pattern with the colorless blender. Then I ripped a small rectangle of my striped fabric for the beach towel.
Next, I ripped some pieces of Kraft and Aqua Mist card stock for my sand and water. I added some sandyness to the Kraft by sponging some Chai ink all over it to warm it up. I also added some squiggly lines with my B00 Copic marker on the Aqua Mist piece to give the water a little something. Then, I punched a circle of Bitty Dot paper in Summer Sunrise and added little pieces of matching twill underneath to act like "rays". All the parts were attached to a Lemon Tart card base and "the joys of summer" came to be! :-)
Thanks so much for stopping by my blog! Have a great evening!
Supplies Used (all PTI unless noted):
Stamps: Day at the Beach
Ink: Pure Poppy, Black, Chai (Vintage Touch Duo), Copics
Paper: Lemon Tart, Aqua Mist, Kraft, White, Summer Sunrise Bitty Dot
Accessories: Summer Sunrise twill; Timeless Treasures fabric
Other/Tools: Paper trimmer, scissors, Scor-Pal, Scor-Tape, foam tape, SU! 1-3/8 circle punch
Clean & Simple Heartfelt Thanks
Happy Thursday! Quick post today with a quick card ... I am still working on that assortment of 40 cards for my friend/customer. I have posted a few other cards for her stash this week and I made 4 of these thank you cards to add to her stash.
Thanks for stopping by! :-) I will be back later this evening with my Papertrey Blog Hop card!
Supplies Used (all PTI unless noted):
Stamps: Life, Everyday Classics
Inks: New Leaf, Spring Moss, Lavender Moon, Memento Rich Cocoa, Vintage Touch duo
Card stocks: Vintage Cream, Lavender Moon, Kraft
Other/Tools: Paper trimmer, Heidi Swapp edge distresser tool, Scor-Pal, Scor-Tape, foam tape
Wednesday, June 24, 2009
Kristina's Color Inspiration #55
Ok, so this is my 3rd post ... I also got my CPS and Raspberry Suite Color Challenges posted today ... I promise not to post anything else until tomorrow, which is the monthly PTI Blog Hop as well! :-) This week, Kristina got this great print off a coworker's skirt. I decided to play around with pattern creation using the Guidelines II set. I like that it is sort of retro but also kind of modern. Here's my card:
Here's a closer view of the sentiment. (Sorry for the bad photo - been playing with the manual settings on my camera - unsuccessfully I might add!) Anyway, I added some twill ribbon in the closest match I had, PTI Summer Sunrise.
Thanks for stopping by to check out my card! Have a great Wednesday! :-)
Supplies Used:
Stamps: PTI Guidelines 2, Everyday Classics
Ink: SU! Basic Gray, Really Rust, More Mustard
Card Stock: PTI Vintage Cream; SU! Really Rust
Accessories: PTI Summer Sunrise twill
Tools/Other: Paper trimmer, scissors, corner rounder punch, Scor-Pal, Scor-Tape
Raspberry Suite Color Challenge #10
Hiya! I have a couple of challenge cards to post today, so I actually have 3 posts going up to get them all in under the deadline! :-) (I really should be working or doing some chores ...)
Anyway, Dawn gave us a great color challenge this week. I love me some Amy Butler fabrics - way cute! Here's her color inspiration photo ...And here's my card ... I used the 2 Sketches 4 You #28 sketch as a jumping off point. I stamped the damask pattern in Berry Sorbet ink onto the Melon Berry card stick, which I really like as a color combo. A simple sentiment and a few pearls keeps it clean and classy. Thanks for stopping by! I have my CPS and Kristina's Color Challenge also posted today, so be sure to check them out. :-)
Supplies Used (all PTI unless noted):
Stamps: Damask Designs
Ink: Berry Sorbet, Dark Chocolate
Card Stock: Melon Berry, Dark Chocolate, Vintage Cream
Accessories: Melon Berry luxe satin; Martha Stewart adhesive pearls
Other: Scor-Pal, Scor-Tape, paper trimmer + scissors
CPS Sketch #121
Howdy folks! Here's a couple of cards I made for the CPS 121 sketch. I needed a couple of baby cards for a few coworkers who are anxiously awaiting their new babies (one girl and one boy) and I needed a few to include in one of my customer's order of an assortment of cards. I made two of these in each color scheme and it was pretty quick to make these assembly line style with the help of patterned paper and circle nestabilities! :-) I think these turned out pretty cutie patootie! Thanks for stopping by! Have a wonderful day! :-)
Supplies Used (all Papertrey Ink):
Stamps: Everyday Classics
Ink: Plum Pudding, Ripe Avocado, Summer Sunrise
Patterned Paper: Bitty Dots - Lavender Moon, Ocean Tides; Polka Dot Parade
Card stock: Plum Pudding, Ripe Avocado, white
Accessories: Lavender Moon & Ocean Tides grosgrain ribbon
Other: Scissors + paper trimmer, Circle nestabilities, Scor-Pal, Scor-tape, foam tape
Tuesday, June 23, 2009
Card Patterns Sketch #20
Hello again! I have been checking out the Card Patterns sketches for quite some time now ... and this is the first time I've been able to get a card done before the next week's sketch goes up! (Insert pat self on back here!)
This week's sketch looked pretty neat. Although there is this flourish thing on the side that was a little scary ... here's what I ended up with. And I do love how it turned out.
I had made some patterned paper about a week or so ago with the Garden of Life set and the Text background set. I had one piece left and I decided to use it as a jumping off point. I don't have the long rectangle scallop nestie, so I cut a (slightly wonky) scallop base using my SU! border punch. I am addicted to aging all my paper now with these great little ink pads. So I added some age to the scallops. I also love this distresser tool and I went to town on the patterned paper and chocolate border as well. I couldn't find my stem die cut, so I stamped a stem and cut it out and added a flower with some foam tape. Here's a closer view.
Thanks for stopping by! Back tomorrow with another sketch card! :-)
Supplies Used (all PTI unless noted):
Stamps: Garden of Life, Background Basics: Text Style
Ink: Melon Berry, Ripe Avocado, Dark Chocolate, Vintage Duo
Card Stock: Vintage Cream, Dark Chocolate, Kraft
Accessories: Melon Berry luxe satin ribbon
Other: Scor-Tape, Scor-Pal, scissors + paper trimmer, edge distresser tool, SU! Scallop Edge punch, foam tape
Quick, Clean & Simple
Hi all! Sorry for the lack of posts the past few days. I was working on some things ... including overhauling my craft room trying to make it more user friendly. I think my new layout is going to work out good with a few more tweaks.
A friend of mine placed an order for 40 assorted cards. I am going with a clean and simple style for them to keep her price down. I decided to include a couple of sympathy cards in her assortment - you never know when you will need one. Here are the 2 that I will be including in her box-o-cards.I will post the other cards (mostly thank you and birthdays) in the coming days for you to see including some fun sketch challenge cards that I am hoping to get to in the next couple of days!
Off to the gym ... happy Tuesday everyone!
Supplies Used (all PTI unless noted):
Stamps: Friends til the End, Everyday Classics
Ink: Memento Rich Cocoa, Copics (E04,R59, 0, E57); PTI Chai & Chamomile
Card stock: Kraft, Spring Moss
Other: Scor-Pal, Scor-Tape, Heidi Swapp Edge Distresser
Friday, June 19, 2009
PTI Swap Card
I have been swapping with the best group of gals over at SCS for several months now. They are all big PTI fans and we enjoy chatting about the products and making cards to swap. For this round, I created a card with the new Cupcake Collection stamp set. Here's my card ...This card is based off of Card Patterns Sketch #13. I didn't use the star - I used a cupcake instead! :-) I started with some Lemon Tart card stock and stamped a criss cross pattern using one of the dotted lines from Faux Ribbon in Berry Sorbet. (Tip: Using a grid line block was super helpful making my plaid mostly evenly spaced!) Then I cut some strips of Bitty Dot paper in Aqua Mist. And then I stamped the "eat cake" sentiment on a Kraft rectangle in Dark Chocolate ink. The cupcake liner was also stamped in Dark Chocolate on Kraft and the icing was stamped on white - I did add a little Copic marker to add some color and make it more interesting. A little edge distressing on the Kraft and Lemon Tart pieces and some ribbon and viola!
If you live in CA or happen to travel there and want some family photos, check out my buddy Krista from Krista Lucas Photography!
Thanks for stopping by! TGIF!
Supplies Used (all PTI unless noted):
Card stock: Lemon Tart, Kraft, White
Designer Paper: Bitty Dot Aqua Mist
Stamps: Cupcake Collection, Faux Ribbon
Ink: Berry Sorbet, Dark Chocolate, Copic R11 & 0
Ribbon: Berry Sorbet luxe satin
Other: Scor-Pal, Scor-Tape, foam tape, paper trimmer, scissors, Heidi Swapp edge distresser tool
Thursday, June 18, 2009
Just a couple of cards ...
My monthly card kit swap wraps up this month and I am trying to catch up! Here's what I came up with for two of the kits ...
First, a little western-themed action. And then some party animals ... I used some glossy accents to make the cupcake look a little more 3D.
Back tomorrow with some new PTI goodness! :-)
First, a little western-themed action. And then some party animals ... I used some glossy accents to make the cupcake look a little more 3D.
Back tomorrow with some new PTI goodness! :-)
Color Comparison for my PTI Friends
Tuesday, June 16, 2009
CPS Sketch 120
Just popping in to post a sketch card I made for this week's Card Positioning Systems sketch #120. I decided to play with the June Unity Kit of the Month - using the ice cream cone and "You're such a treat" sentiment. I think those two stamps are just the cutest! I love polka dots, so I went with a ton of PTI's Bitty Dot paper to create some pattern in the card. Got to love all those dots! I love how bright and playful this ended up. :-) Thanks for stopping by! Hope you have a wonderful day!
Supplies Used:
Card stock: PTI Aqua Mist, Sweet Blush
Designer Paper: PTI Bitty Dot (Raspberry Fizz, Aqua Mist, Lemon Tart, Summer Sunrise)
Stamps: Unity June KOTM
Ink: PTI Dark Chocolate
Accessories: PTI Lemon Tart satin ribbon; PTI Sweet Blush button; Bazzill Basics Paper Just the Edge strip; DMC Floss
Other: paper trimmer, scissors, Scor-Pal, Scor-Tape, Glossy Accents
Monday, June 15, 2009
My New Button Storage
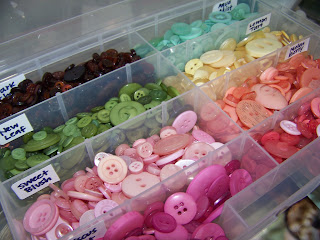
Hi again! I had to make a run to Joann's for some fabric supplies and I found these great storage containers on sale. They were about $2 bucks and I got two of them. They are meant to hold jewelry making supplies, but I knew they had potential for my button collection from PTI. I wrote the button color on some file folder labels and trimmed them down and stuck them inside each container partition before dumping the buttons in. I really love them all displayed like this instead of a mound of bags on my desk! :-) Here's a shot of the container closed and then one open so you can see all those pretty buttons!
Flowers!
I don't know about you, but I love flowers. I especially love hydrangea and I have been wanting a hydrangea bush for quite some time. Still waiting on that one to show up in my yard! Anyway, my mom has a monster-sized bush and she cut me some lovely blooms for me to take home. (Excuse the crap on my table! :-) Aren't they just beautiful?
I also got a new orchid this week. It's a little orchid - a $10 baby from Lowe's but its the prettiest color and I can't wait for the rest of those buds to pop open! :-)
Hope you have a wonderful day! :-)
I also got a new orchid this week. It's a little orchid - a $10 baby from Lowe's but its the prettiest color and I can't wait for the rest of those buds to pop open! :-)
Hope you have a wonderful day! :-)
Sunday, June 14, 2009
Raspberry Suite Color Challenge # 9
Dawn has challenged us again with another Raspberry Suite Color Challenge. Black and green are some of my favorite colors, but I don't often use them together. Here's the inspiration photo that Dawn provided:
I decided to make another text style vintage-y looking paper and go with an elegant theme. I started by stamping the leaf image from the Life set in New Leaf and then layered the Background Basics: Text Style stamp over the leaves in Palette Noir ink. A few layers of coordinating card stock, some distressing with the Heidi Swapp edge distresser tool and the main image was all done. I stamped the sentiment from Damask Designs on a scrap of paper and popped that up on foam tape. I really like how this turned out. I will definitely try this out in a few other color combos!
Thanks for stopping by to check out my take on this week's Color Challenge!
Supplies Used (all PTI unless noted):
Card stock: Vintage Cream, New Leaf, True Black
Stamps: Life, Background Basics: Text Style, Damask Designs
Ink: New Leaf, Palette Noir
Accessories: True Black satin ribbon
Other: Paper trimmer, Scor-Pal, Scor-Tape, foam tape, scissors, edge distressor tool
"Vintage" Paper Birthday
Here's a birthday card I made this afternoon. The patterned paper was inspired by a card that Nichole of PTI showed off in her post today. (Its the 2nd to last card in her post.) It's just too pretty so I thought I'd try it out. I made some extra pieces of this paper to use in my background swap on SCS - hope my fellow swappers will enjoy it!
I started by stamping the flower image in Melon Berry ink on quarter sheets of Vintage Cream. card stock. I went back and added the leaf image in Ripe Avocado ink and then added the Text Style background stamp over all of it in Dark Chocolate. A little bit of corner rounder action and a sentiment from Damask Designs and there you have it. I really like this paper - I will have to try it out in some other color combinations!
Supplies Used (all PTI unless noted):
Card stock: Vintage Cream, Kraft, Ripe Avocado
Stamps: Garden of Life, Background Basics: Text Style, Damask Designs
Ink: Melon Berry, Ripe Avocado, Dark Chocolate
Accessories: Melon Berry grosgrain ribbon
Other: Paper trimmer, Scor-Pal, Scor-Tape, corner rounder punch
Saturday, June 13, 2009
Fall to Layout 45
Just a quick post today with a quick card from the Clean & Simple blog. I love their uncomplicated sketches! :-) This one is FTL #45. Happy Saturday!
Supplies Used:
Card stock: SU! Certainly Celery; PTI Lemon Tart, Hibiscus Burst
Designer Paper: My Minds Eye
Stamps: PTI Friends til the End
Ink: PTI Dark Chocolate
Accessories: PTI Melon Berry vintage button
Other: Fiskars edge punch, Heidi Swapp edge distresser tool, paper trimmer, Scor-Pal, twine, Scor-Tape, scissors
Friday, June 12, 2009
Color Inspiration #54
Happy Friday! It feels like the weekend to me since today was the first day of summer vacation for me and husband also took the day off. We enjoyed a movie and late lunch and then I got to play around in my office! Here's my take on Kristina's Color Inspiration Challenge #54. I started with a 4.25" square card base - I did distress the edges a bit. I ripped some card stock circles and folded them all up to make some rumply flowers and used the same process to make the leaves. I added some teal dots with a Copic marker - kind of reminded me of the orchid I saw at Home Depot today. A little button, ribbon and a happy birthday sentiment and there you have it.
Thanks for dropping by! :-)
Supplies Used:
Card stock: PTI Spring Rain, New Leaf, Stampers Select White; SU! Tangerine Tango
Ink: Ink It Up in Turquoise; Copics BG49, BG09
Stamps: PTI Faux Ribbon
Accessories: SU! Fresh Snow ribbon and button, DMC floss
Other: Paper trimmer, Scor-Pal, Scor-Tape, Heidi Swapp Edge Distresser tool, scissors
Thanks for dropping by! :-)
Supplies Used:
Card stock: PTI Spring Rain, New Leaf, Stampers Select White; SU! Tangerine Tango
Ink: Ink It Up in Turquoise; Copics BG49, BG09
Stamps: PTI Faux Ribbon
Accessories: SU! Fresh Snow ribbon and button, DMC floss
Other: Paper trimmer, Scor-Pal, Scor-Tape, Heidi Swapp Edge Distresser tool, scissors
Wednesday, June 10, 2009
Blooming for a Cure 2009
Hi everyone! Sorry for the lack of posts lately. Been pretty busy here closing out the school year. I only have ONE more day before summer is officially on! I am excited but a little sad to leave my current school for a new one next year. Not to mention moving all my crap is a lot of work! But I am hoping that my new position will be great.
Last weekend, I went to my sorority's national convention. Our philanthropy is the Ovarian Cancer National Alliance and for the second year in a row, my mom and I collaborated on a quilt to help raise money in our philanthropy raffle. The flowers on the quilt are made with the "omega holes" when I cut out the Omega to make t-shirts. This year, I have done a lot of letter shirts with black and white fabrics, so we decided to use those as the jumping off point. The close up shots have much better lighting - sorry about the full quilt photo's terribleness. I am excited to report that this year, we raised over $700 in our raffle - all to support ovarian cancer awareness. I promise to get back to some other fun projects and start posting again this week! Hope you are all enjoying the week!
Thursday, June 4, 2009
Blog Award
Kim over at Memories in Thyme gave me an award because she thinks my blog is fabulous! Thanks, Kim, that was so sweet of you to award my blog! :-) I *believe* I am supposed to pass this award onto 5 others ... here's a few of my fab blogging, papercrafting friends I'd like to share the honors with ... Chris, Sarah, Janet, Amy, and a kind of new crafter, my friend Krista!
TGIF everyone!
TGIF everyone!
Happy Birthday!
Hi all! Today is my husband's birthday!!! He's already over 30, so we'll just leave his age out of it! LOL As I mentioned yesterday, he doesn't really care about cards (but he is jealous of all the mail I get ... hmmm ...) and he said I could make a card and save a buck or two! He did request no ribbon - the nerve! Since we are both silly, I thought I'd make a silly card. I used an SU! Sock Monkey image that some sweet person on SCS RAKed me awhile back. The paper is from the Basic Grey Lime Rickey paper pad and I added a sentiment from PTI's Everyday Classics set. Pretty cute - hope he likes it. :-) I will write something sappy on the inside like "you're my BFF, my favorite, blah blah blah" - we've only been married like 2 years so we still like each other! LOL I hope you all have a wonderful day!
Supplies Used:
Card stock: PTI Stampers Select White
Designer Paper: Basic Grey Lime Rickey collection
Stamps: SU! Sock Monkey & Accessories; PTI Everyday Classics
Ink: Copic markers; PTI Dark Chocolate
Other: Paper trimmer, scissors, Scor-Pal, Scor-Tape, foam tape, Glossy Accents
Supplies Used:
Card stock: PTI Stampers Select White
Designer Paper: Basic Grey Lime Rickey collection
Stamps: SU! Sock Monkey & Accessories; PTI Everyday Classics
Ink: Copic markers; PTI Dark Chocolate
Other: Paper trimmer, scissors, Scor-Pal, Scor-Tape, foam tape, Glossy Accents
Subscribe to:
Posts (Atom)